Fruit and Nut Chocolate Bar
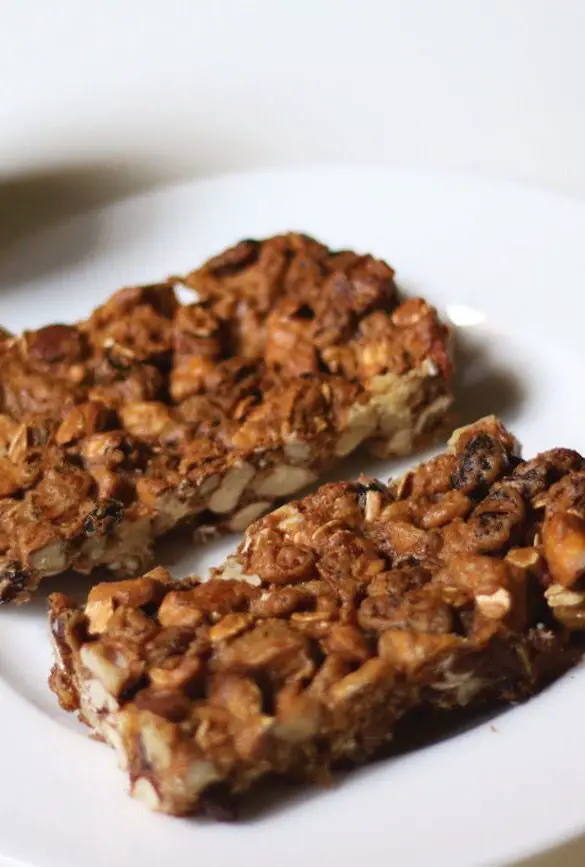
Looking to satisfy your sweet tooth with a healthy twist? The Fruit and Nut Chocolate Bar is the perfect combination of succulent nuts and dried fruits mixed with chocolate chips and oats.
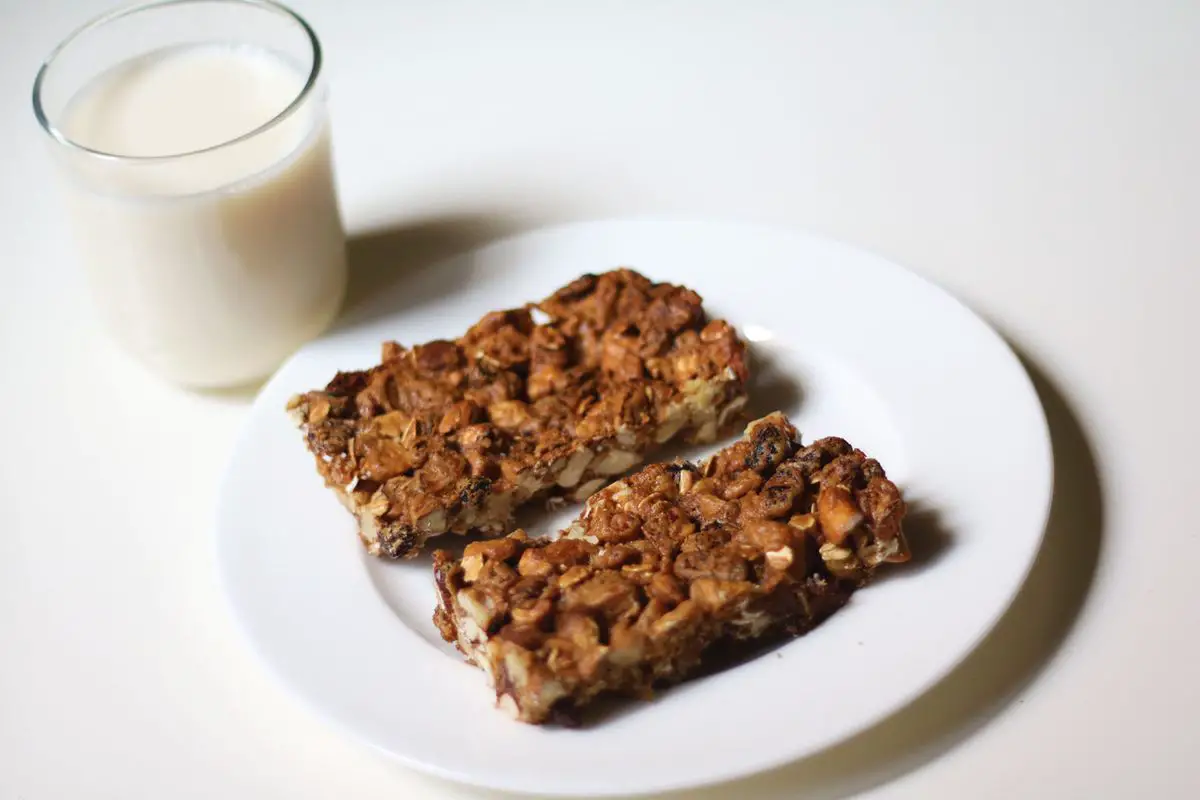
Welcome to our blog post about the irresistible fruit and nut chocolate bar! This delectable treat combines the rich, indulgent flavor of chocolate with the wholesome goodness of nuts and dried fruits. Perfect for satisfying your sweet tooth while also providing a nutritious boost, these chocolate bars are a delightful addition to any snack or dessert spread. Follow along as we share the recipe and step-by-step instructions for creating your very own fruit and nut chocolate bars at home. Let's dive in and discover the deliciousness of this delightful treat!
What Is Fruit and Nut Chocolate Bar?
- Looking to satisfy your sweet tooth with a healthy twist? The Fruit and Nut Chocolate Bar is the perfect combination of succulent nuts and dried fruits mixed with chocolate chips and oats, all brought together with a hint of spices and unique seasoning. This delightful treat is not only delicious but also packed with nutrients, making it a guilt-free indulgence.
- With a blend of chopped nuts, dried cherries, cranberries, raisins, dates, figs, and apricots, this recipe offers a burst of flavors and textures that will leave your taste buds wanting more. Whether you're craving a midday snack or a post-dinner dessert, the Fruit and Nut Chocolate Bar ticks all the boxes for a satisfying treat that's both wholesome and scrumptious.
Why You'll Love Fruit and Nut Chocolate Bar?
- Deliciously Crunchy Texture: The combination of chopped nuts, dried fruits, and oats creates a delightful crunch with every bite, making it a satisfying and enjoyable snack or dessert option.
- Nutrient-Packed Ingredients: Dried fruits and nuts are known for their health benefits, including being rich in antioxidants, fiber, and essential nutrients. This makes the fruit and nut chocolate bar a great choice for a nutritious and energizing treat.
- Indulgent Chocolate Flavor: The addition of chocolate chips not only adds a rich, indulgent flavor to the bars but also provides a dose of antioxidants and a mood-boosting effect, making it a healthier alternative to traditional chocolate bars.
- Perfect for On-the-Go: These bars are convenient to grab and take with you for a quick energy boost. They are ideal for snacking during busy days, on hikes, or as a post-workout pick-me-up.
- Versatile and Customizable: You can tailor the recipe to your taste preferences by swapping out different types of nuts, dried fruits, or even experimenting with dark chocolate chips for a more intense cocoa flavor.
- Ideal for Meal Prep and Storage: These bars can be made in advance and stored in the refrigerator for several days in an airtight container, making them a great option for meal prepping or as a make-ahead snack for busy weeks.
Ingredients for Fruit and Nut Chocolate Bar
- Chopped Nuts: The chopped nuts add a crunchy texture and nutty flavor to the chocolate bar, providing a satisfying bite with every mouthful.
- Dried Cherries, Cranberries, Raisins: These dried fruits add a natural sweetness and hints of tartness to the chocolate bar, balancing the richness of the chocolate and nuts.
- Chopped Dates, Figs, and Apricots: The chopped dates, figs, and apricots contribute a chewy and sticky texture, as well as a subtle, natural sweetness to the chocolate bar.
- Rolled Oats: The rolled oats add a hearty and wholesome element to the chocolate bar, providing a distinct, slightly nutty flavor and a chewy bite.
- Chocolate Chips: The chocolate chips bring a rich and indulgent chocolate flavor to the bar, melting slightly during baking to create pockets of gooey, chocolatey goodness.
- All Purpose Flour: The all-purpose flour helps bind the ingredients together and adds structure to the chocolate bar, giving it a satisfying density and firmness.
How To Make Fruit and Nut Chocolate Bar?
To make a delicious fruit and nut chocolate bar, follow these simple steps:
- Preheat the oven to 160 degrees C and line an 8-inch square baking pan with foil, ensuring that it covers the edges.
- In a large bowl, mix the chopped nuts, dried fruits, chopped dates, other fruits, chocolate chips, and oats until well combined.
- Add flour, baking soda, salt, and brown sugar to the fruit and nut mixture and stir until all the fruits and nuts are completely coated.
- In a separate bowl, beat the egg and add vanilla essence using a hand mixer until light-colored and foamy.
- Add the egg mixture to the fruit and nut mixture and mix until well coated.
- Evenly spread the mixture into the prepared pan and press it firmly.
- Bake for about 35 to 40 minutes or until it becomes golden brown and is just starting to pull away from the sides of the pan.
- Remove from the oven and place it on a wire rack to cool.
- Cut the bars into rectangular shapes using a sharp knife and lift them from the pan using the edges of the foil.
- Store the fruit and nut chocolate bars in an airtight container in the refrigerator for several days.
Each step is crucial in creating the perfect fruit and nut chocolate bar. Mixing the ingredients thoroughly ensures a well-balanced flavor, while baking to the perfect golden brown color and allowing it to cool properly ensures a delicious and satisfying treat.
Serving Suggestions
- Pair with a refreshing beverage: Enjoy your fruit and nut chocolate bar with a glass of cold milk, a cup of hot tea, or a refreshing fruit smoothie for a delightful treat.
- Serve with a scoop of vanilla ice cream: For a decadent dessert, pair your fruit and nut chocolate bar with a scoop of creamy vanilla ice cream. The combination of the sweet and crunchy bar with the cold and smooth ice cream is sure to be a hit.
- Accompany with fresh fruit: Add a healthy touch to your snack by serving the fruit and nut chocolate bar with a side of fresh fruit, such as sliced apples, strawberries, or bananas. The combination of the chewy bar with the juicy fruit will create a perfect balance of flavors and textures.
- Enjoy with a cup of coffee or milk: If you're a coffee lover, pair your fruit and nut chocolate bar with a steaming cup of coffee. The rich and robust flavors of the coffee will complement the sweetness of the bar.
- Add a dollop of whipped cream: For an indulgent treat, top your fruit and nut chocolate bar with a dollop of whipped cream. The light and fluffy texture of the cream will contrast with the dense and chewy bar.
- Serve alongside a cheese platter: For a unique and savory snack, pair your fruit and nut chocolate bar with a selection of cheeses and crackers. The combination of sweet and salty flavors will create a delicious and satisfying snack.

Tips for Making Fruit and Nut Chocolate Bars
Furthermore, I would like to give some of my suggestions for making a perfect fruit nut chocolate bars.
- How to buy dried fruits: Try to buy the good quality of dried fruits. But there are a few things to keep in your mind while buying dried fruits. Try to buy fresh dry fruits in bulk from a natural food store, because they have a high turnover. Pre-packaged fruit can also be excellent. But if you want to buy packed dried fruits, then don’t forget to check the expiry date on the package.
- Variations to Explore: Feel free to experiment with different combinations of nuts, fruits, and chocolate. You can also try adding a sprinkle of sea salt for a salty-sweet flavor profile. The possibilities are endless when it comes to customizing this delicious treat.
- Cooking Techniques: When baking the fruit and nut chocolate bars, make sure to preheat the oven to 160 degrees C and line the baking pan with foil. Be sure to evenly spread the mixture in the pan and press it firmly to achieve the desired texture.
- Importance of Garnishing: After baking, consider garnishing the fruit and nut chocolate bars with a drizzle of melted chocolate or a sprinkle of powdered sugar. This will not only enhance the presentation but also add a touch of sweetness.
- Cooling and Cutting: After baking, allow the bars to cool on a wire rack before cutting them into rectangular shapes. Using a sharp knife, carefully lift the bars from the pan using the edges of the foil for easy removal.
Variations for Fruit and Nut Chocolate Bar
- Nut-Free Option: For those with nut allergies, you can substitute the chopped nuts with seeds such as pumpkin seeds, sunflower seeds, or even coconut flakes for a crunchy texture without the nuts.
- Different Dried Fruits: Feel free to mix and match different dried fruits like apricots, pineapple, or even mango for a tropical twist. Experiment with different flavors and textures to find your perfect combination.
- Dark Chocolate Chips: If you prefer a richer chocolate flavor, swap the milk chocolate chips for dark chocolate chips. This will give your chocolate bar a more intense and decadent taste.
- Gluten-Free Version: For a gluten-free option, replace the all-purpose flour with a gluten-free flour blend. You can also use almond flour or coconut flour for a nutty flavor.
- Add Some Spice: For an extra kick of flavor, consider adding a pinch of cinnamon, nutmeg, or even a dash of cayenne pepper for a spicy twist. Play around with different spices to customize the bars to your taste.
- Nut Butter Swirl: Create a marble effect by swirling in some almond butter, peanut butter, or cashew butter into the mixture before baking. This will add a creamy and indulgent touch to your fruit and nut chocolate bars.
How to Store Fruit and Nut Chocolate Bar
- Proper Storage is Key: To maintain the freshness of your homemade fruit and nut chocolate bars, it's important to store them properly.
- Refrigerate in an Airtight Container: Store the bars in an airtight container in the refrigerator to keep them fresh for several days. This will prevent them from drying out and maintain their chewy texture.
- Protect the Key Ingredients: Since the bars contain nuts, dried fruits, and chocolate, it's important to protect these key ingredients from moisture and air. Make sure the container is tightly sealed to prevent the ingredients from losing their flavor and texture.
- Avoid Direct Sunlight: Keep the container of fruit and nut chocolate bars away from direct sunlight, as exposure to light can cause the chocolate to melt and the nuts and fruits to spoil.
- Use Freezer for Longer Storage: If you want to enjoy your fruit and nut chocolate bars for a longer period, you can also store them in the freezer. Simply wrap them in parchment paper and place them in a freezer-friendly container or a resealable freezer bag.
- Thaw Properly: When you're ready to enjoy the frozen bars, allow them to thaw in the refrigerator for a few hours before serving. This will ensure that they maintain their delicious taste and texture.
By following these simple storage tricks, you can ensure that your homemade fruit and nut chocolate bars stay fresh and delicious for as long as possible.
Frequently Asked Questions (FAQs)
Can I use different nuts and fruits in this recipe?
- Yes, you can definitely customize the nuts and fruits in this recipe based on your preferences. You can use almonds, walnuts, or any other nuts, and swap out the dried cherries, cranberries, or raisins for dried apricots, figs, or any other dried fruits of your choice.
Can I make this recipe without eggs?
- Yes, you can make this fruit and nut chocolate bar recipe without eggs. Simply substitute the egg with a flaxseed or chia seed "egg" by mixing 1 tablespoon of ground flaxseeds or chia seeds with 3 tablespoons of water. Let it sit for a few minutes to thicken before adding it to the recipe.
How can I make this recipe gluten-free?
- To make this recipe gluten-free, simply replace the all-purpose flour with a gluten-free flour blend. Make sure all the other ingredients, including the oats and chocolate chips, are also certified gluten-free.
Can I reduce the sugar in this recipe?
- Yes, you can reduce the sugar in this recipe. You can use a natural sweetener like maple syrup or honey instead of brown sugar, or simply reduce the amount of sugar if you prefer a less sweet version of the fruit and nut chocolate bars.
Can I add other mix-ins to this recipe?
- Absolutely! You can get creative and add additional mix-ins like shredded coconut, chopped dark chocolate, or even a sprinkle of sea salt on top before baking to enhance the flavor and texture of the bars.
How should I store the fruit and nut chocolate bars?
- To keep the fruit and nut chocolate bars fresh, store them in an airtight container in the refrigerator for several days. This will help maintain their texture and prevent them from drying out.
Recipe Card
Fruit and Nut Chocolate Bar
Fruit and Nut Chocolate Bar 2017-08-05 05:01:13

Serves 10
Prep Time 00:20
Cook Time 00:40
Total Time 01:00
Ingredients
- 1&1/2 cups (175 g) chopped nuts (I used walnuts, almonds, cashews and pecans)
- 1 cup (140 g) dried cherries, cranberries, raisins
- 1 cup chopped dates, figs and apricots
- 1/4 cup rolled oats
- 1/3 cup chocolate chips
- 1/3 cup all purpose flour
- 1/8 tsp baking soda
- 1/4 tsp salt
- 1/3 cup (65 g) firmly packed light brown sugar
- 1 large egg at room temperature
- 1/2 tsp vanilla essence
Instructions
- Preheat oven to 160 degrees C. Then line 8 inch square baking pan with foil which covers over the edges.
- In a large bowl, mix the chopped nuts, dried fruits, chopped dates and other fruits, chocolate chips and oats until combined.
- Then add flour, baking soda, salt and brown sugar, stir until all the fruits and nuts are completely coated.
- In a separate bowl, beat the egg and add vanilla essence by using a hand mixer until light colored and foamy.
- Then add this egg mixture to the fruit and nut mixture and mix till they are well coated.
- Then evenly spread this mixture into the prepared pan and press them firmly.
- Bake it for about 35 to 40 mins or until it becomes golden brown and is just starting to pull away from the sides of the pan.
- Then remove from the oven and place it on the wired rack to cool.
- Cut it into rectangular shapes by using a sharp knife. Lift the bars from the pan by using the edges of the foil.
- You can also store the fruit nut chocolate bars in an airtight container in your refrigerator for several days.
- By Santhi Therese The Indian Claypot
- https://theindianclaypot.com/
