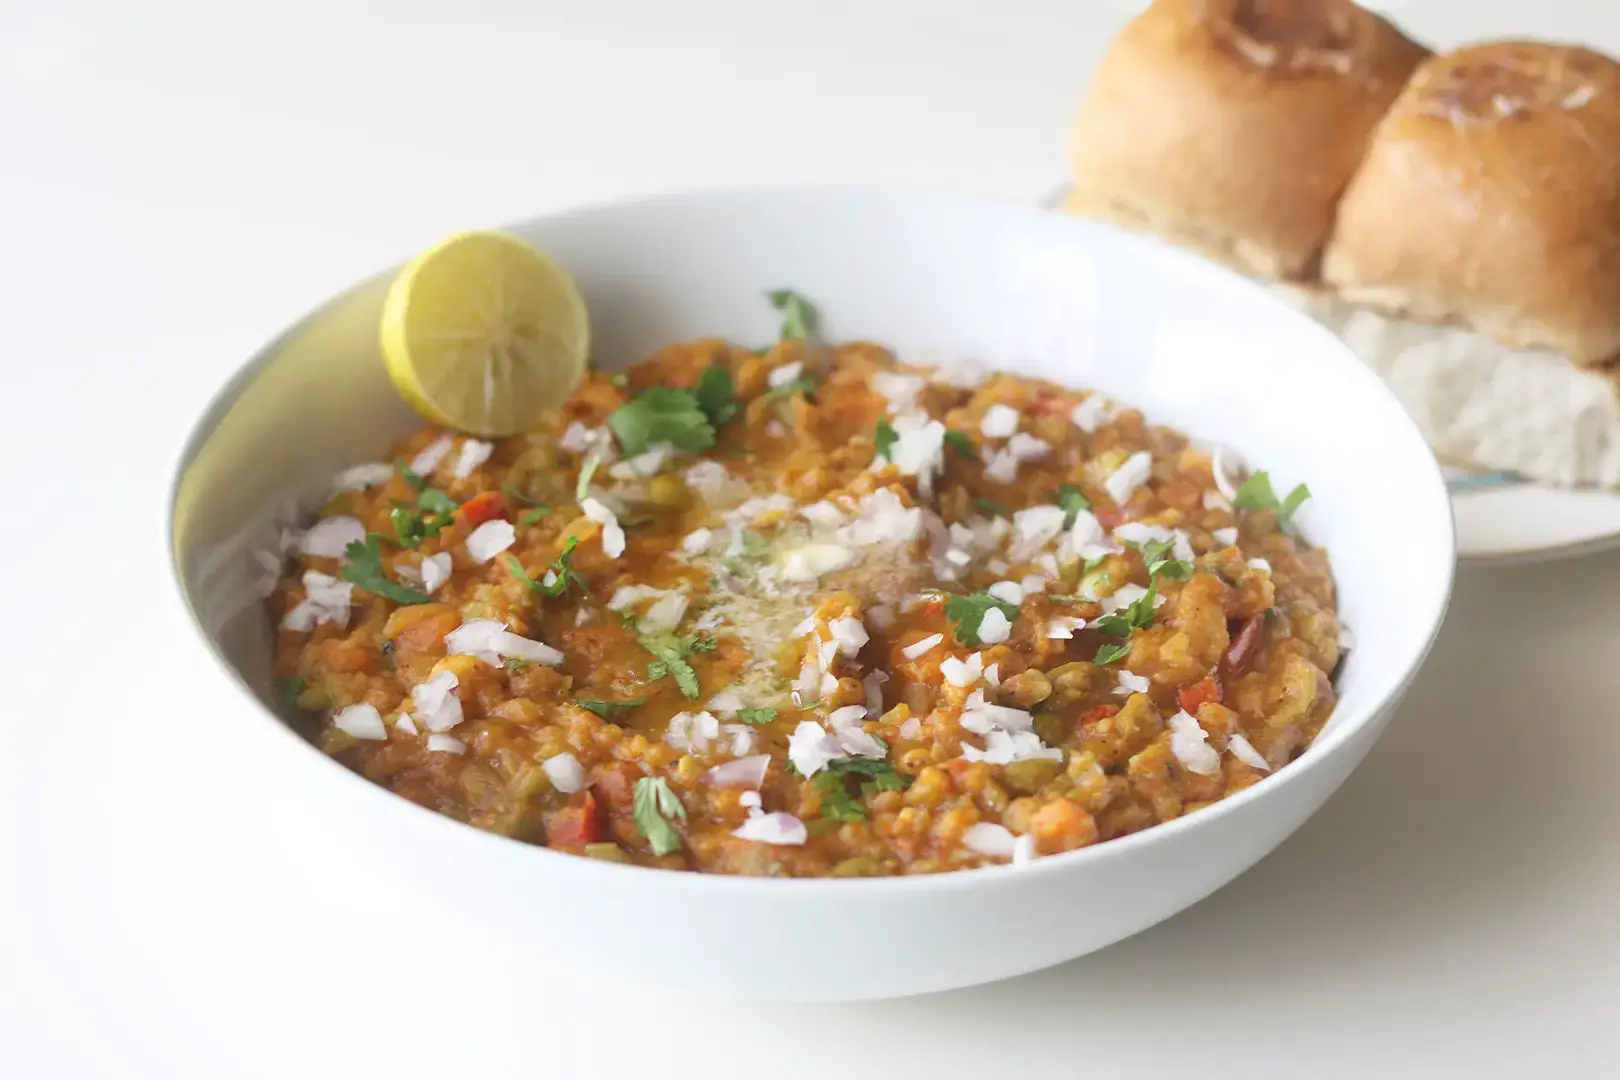
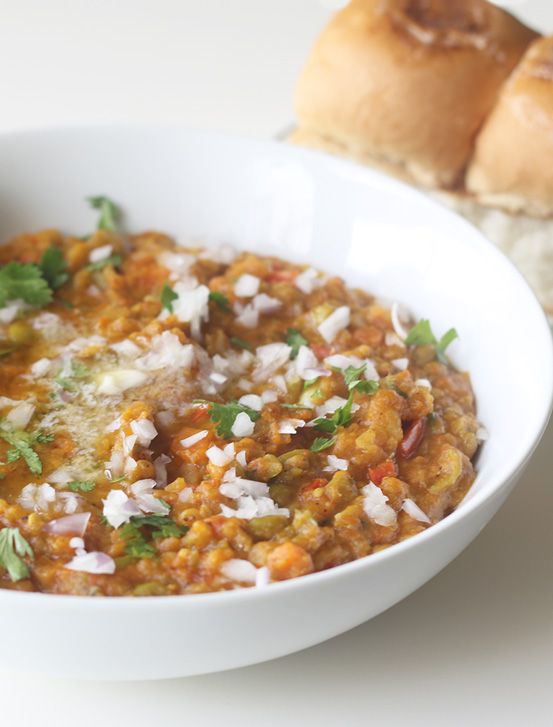
Pav Bhaji Recipe
Pav means soft bun or dinner roll. Bhaji is a mixed vegetable gravy with some flavorful spices. Since pav and bhaji are served together, hence it is called Pav Bhaji.

Are you looking for a delicious and easy to make Indian street food recipe? Look no further! Today, we're going to talk about how to make the popular and mouthwatering pav bhaji. This recipe is a flavorful blend of mashed vegetables cooked with a medley of spices and served with toasted pav buns. It's a favorite among both kids and adults and is sure to become a regular in your meal rotation. So, let's dive into the steps for making this delectable pav bhaji recipe!
What Is Pav Bhaji Recipe?
- Pav bhaji is a popular Indian street food dish that consists of a flavorful vegetable mash served with buttered and toasted pav buns. This delicious recipe incorporates a variety of succulent vegetables such as potatoes, cauliflower, green beans, carrots, and green peas, along with a blend of aromatic Indian spices.
- The combination of these main ingredients, along with the unique seasoning of pav bhaji masala, creates a rich and savory dish that is sure to delight the taste buds. Whether enjoyed as a quick snack or a satisfying meal, pav bhaji is a flavorful and satisfying dish that is loved by many.
Why You'll Love Pav Bhaji?
- Delicious Texture: This pav bhaji recipe results in a thick and flavorful mixture of mashed vegetables, perfectly complemented by the soft and slightly crispy pav buns. The combination of textures creates a truly satisfying dish that's enjoyable to eat.
- Healthy Ingredients: This recipe is packed with nutritious vegetables like potatoes, cauliflower, green beans, carrots, and green peas. These veggies offer a range of health benefits, including being rich in vitamins, minerals, and fiber, making pav bhaji a wholesome meal choice.
- Low in Calories: Despite its rich flavors, pav bhaji is surprisingly low in calories when prepared without excess oil or butter. This makes it a great option for those looking to enjoy a tasty dish without consuming too many calories.
- Good Source of Antioxidants: The variety of vegetables used in pav bhaji provide a good source of antioxidants, which can help protect the body from harmful free radicals and reduce the risk of certain diseases.
- Versatile: This dish can be easily customized to suit different tastes. Whether you prefer it spicy or mild, with or without extra butter, there's a way to make pav bhaji that will suit your preferences.
- Easy to Prepare: With simple cooking instructions, this pav bhaji recipe is easy to follow and can be prepared in a relatively short amount of time, making it a convenient choice for busy days.
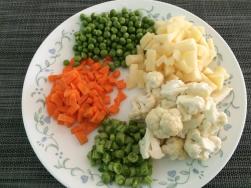
Ingredients for Pav Bhaji Recipe
- Potato: Adds a creamy texture and thickness to the dish, making it filling and flavorful.
- Cauliflower: Brings a subtle nutty flavor and provides a soft texture to the bhaji.
- Green Beans: Adds a crunchy texture and a hint of sweetness to the bhaji.
- Carrot: Adds a natural sweetness and vibrant color to the dish, enhancing its visual appeal.
- Green Peas: Brings a pop of sweetness and a burst of freshness to the bhaji.
- Tomatoes: Provides a tangy and slightly sour flavor, balancing the sweetness of the other vegetables in the dish.
These ingredients combine to create a flavorful and hearty pav bhaji that is sure to delight your taste buds.
How To Make Pav Bhaji?
To make delicious pav bhaji, follow these simple steps:
- Start by cooking all the veggies in a pressure cooker with one cup of water until you hear 2 whistles over medium heat. Alternatively, you can cook the veggies in a pan with 1&1/2 cups of water until they are soft. The key here is to ensure that the veggies are well-cooked and mashable.
- Once the pressure releases, open the lid and mash the veggies well. This step is crucial for achieving the desired consistency of the pav bhaji.
- Heat a pan with oil and butter, then add chopped onion and fry until translucent. Adding ginger and garlic paste at this stage will infuse the dish with a wonderful aroma.
- Add chopped tomatoes and capsicums, along with salt, and cook until the tomatoes are soft and mushy. This step is important for building the base flavors of the pav bhaji.
- Add the spices – chilli powder, pav bhaji masala, cumin powder, and turmeric powder – and stir-fry until their raw smell goes. This is key for developing the iconic flavor profile of pav bhaji.
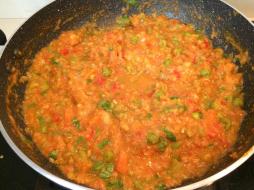
- Add water and bring it to a boil, then mix in the mashed veggies and cook until the mixture thickens. Adjust the consistency to your liking at this stage.
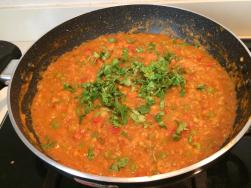
- Once the pav bhaji is ready, finish it off by adding chopped coriander leaves and a squeeze of lemon juice. These final touches will enhance the flavors of the dish.
- While the pav bhaji is cooking, prepare the buns by toasting them with butter until lightly crisp. The buttery, toasted pav buns are the perfect accompaniment to the flavorful bhaji.
By following these steps, you can create a delicious batch of pav bhaji that is bursting with authentic Indian flavors. Enjoy your homemade pav bhaji with chopped onion, coriander leaves, and a squeeze of lemon juice for a delightful culinary experience!

Serving Suggestions
- Pav Bhaji Pairing: For a complete meal, serve the pav bhaji with a side of sliced onions, lemon wedges, and chopped coriander leaves. The fresh and zesty flavors of these sides complement the rich and spicy pav bhaji.
- Potato Crisps: Pair the pav bhaji with some crispy potato crisps or potato wedges for an added crunch and texture to the meal.
- Refreshing Beverage: A refreshing beverage like buttermilk or lemonade pairs well with the hearty and flavorful pav bhaji, balancing out the spiciness of the dish.
- Side Salad: Serve the pav bhaji with a side salad of cucumber, tomato, and onion drizzled with lemon juice for a light and refreshing addition to the meal.
- Garlic Bread: Add some garlic bread on the side to soak up the delicious bhaji and enhance the meal with its garlicky flavor.
- Mixed Pickles: A side of mixed pickles or mango chutney adds a tangy and spicy kick to the pav bhaji, elevating the overall flavor profile of the meal.
Tips for Making Delicious Pav Bhaji
- Preparation Time: The preparation time for this pav bhaji recipe is about 20 minutes, and the cooking time is approximately 30 minutes. It's a quick and easy recipe that doesn't require a lot of prep work, making it perfect for busy weeknights.
- Cooking Techniques: To ensure that the vegetables are cooked perfectly, you can either pressure cook them for two whistles, or cook them in a pan with water until they are soft. Make sure to mash the vegetables well before adding them to the masala mixture for a smooth consistency.
- Garnishing for Presentation: Garnishing plays a crucial role in presenting the pav bhaji. Don't forget to garnish with chopped onion, fresh coriander leaves, and a squeeze of lemon juice before serving. This not only adds flavor but also enhances the visual appeal of the dish.
- Buttered Pav Buns: To elevate the flavor of the pav buns, toast them with butter on a pan or tawa until they are lightly crisp. This simple step adds a delicious buttery flavor to the buns, making them the perfect accompaniment to the spicy pav bhaji.
- Adjusting Spice Level: Feel free to adjust the spice level according to your preference. You can increase or decrease the amount of red chili powder and pav bhaji masala to suit your taste.
- Serving Suggestions: Serve the hot and spicy pav bhaji alongside the buttered pav buns, and don't forget to include extra chopped onion, coriander leaves, and lemon wedges on the side for an authentic dining experience. Enjoy!
Variations for Pav Bhaji Recipe
- Vegetable Variations: Feel free to add or swap out veggies in the pav bhaji recipe. You can include bell peppers, broccoli, or even spinach for added nutrients and flavors.
- Protein Additions: For a heartier pav bhaji, consider adding protein-rich ingredients like paneer, tofu, or even cooked lentils. These additions can enhance the texture and make the dish more filling.
- Spice Level: Adjust the spice level based on your preference. You can increase or decrease the amount of red chili powder and pav bhaji masala to suit your taste buds.
- Vegan Options: To make this recipe vegan, simply substitute the butter with vegan butter or oil. You can also skip the butter altogether and use a plant-based alternative.
- Gluten-Free Option: If you're sensitive to gluten, serve the pav bhaji with gluten-free bread or buns. You can also enjoy the bhaji on its own or with rice for a gluten-free meal.
- Garnish Ideas: Get creative with the garnishes! Consider adding a dollop of yogurt, a sprinkle of cheese, or a drizzle of cream for extra richness and flavor. Experiment with different herbs and spices for a unique touch to your pav bhaji.
How to Store Pav Bhaji
- Storing the vegetables: After purchasing the vegetables, store them in a cool, dry place. Keep the potatoes and onions in a dark, cool place to prevent sprouting. Store the green peas and cauliflower in the refrigerator to maintain their freshness.
- Preserving the pav bhaji masala: To maintain the flavor and aroma of the pav bhaji masala, store it in an airtight container in a cool, dark place. Avoid exposing it to heat and humidity, as it can cause the spices to lose their potency.
- Proper storage of pav buns: To keep the pav buns fresh, store them in a paper bag or a bread box at room temperature. Avoid storing them in plastic bags, as it can make the buns damp and soggy.
- Maintaining the lemon wedges: After cutting the lemon into wedges, store them in an airtight container in the refrigerator. This will help to prevent them from drying out and maintain their juiciness.
- Preserving the chopped coriander leaves: To keep the coriander leaves fresh, wash and dry them thoroughly before storing them in a damp paper towel in the refrigerator. This will help to retain their green color and crispness.
- Storing the leftover pav bhaji: If you have any leftover pav bhaji, allow it to cool completely before transferring it to an airtight container. Store it in the refrigerator for up to 3 days. When reheating, add a little water to prevent it from drying out.
Following these simple storage tricks will help to maintain the freshness and flavor of the key ingredients used in this delicious pav bhaji recipe.
Frequently Asked Questions (FAQs)
Can I adjust the spice level of the pav bhaji?
- Yes, you can adjust the spice level of the pav bhaji by increasing or decreasing the amount of red chilli powder and pav bhaji masala according to your preference.
Can I use frozen vegetables instead of fresh ones?
- Yes, you can use frozen vegetables instead of fresh ones. Just make sure to thaw them before adding to the recipe.
Can I make pav bhaji without a pressure cooker?
- Yes, you can make pav bhaji without a pressure cooker. Simply cook the veggies in a pan with water until they are soft and then proceed with the recipe as directed.
How long does it take to cook the pav bhaji?
- The cooking time for pav bhaji may vary, but in general, it takes about 25-30 minutes to cook the pav bhaji once all the ingredients are prepared.
Can I make the pav buns at home?
- Yes, you can make the pav buns at home by following a simple bread recipe. Alternatively, you can also find pav buns at your local bakery or grocery store.
Can I add other vegetables to the pav bhaji?
- Yes, you can customize the pav bhaji by adding other vegetables such as bell peppers, spinach, or even mushrooms to enhance the flavor and nutritional value of the dish.
Recipe Card
Pav Bhaji Recipe 2020-09-05 04:33:55
Pav Bhaji Recipe
Serves 4
Prep Time: 00:15
Cook Time: 00:15
Total Time: 00:30
Ingredients
- 250 grams, diced potato
- 1 cup cauliflower florets
- 1/4 cup, chopped green beans
- 1 medium sized, chopped carrot
- 1/2 cup green peas
- 1 cup water
- 1 tbsp oil
- 1 tbsp butter
- 3/4 cup, finely chopped onion
- 1&1/2 tsp ginger and garlic paste
- 2 medium sized, finely chopped (3/4 cup) tomatoes
- 1/2 cup, chopped red and green capsicums
- to taste salt
- 1 tsp red chilli powder
- 1/4 tsp turmeric powder
- 1 tbsp pav bhaji masala
- 1/2 tsp cumin powder
- 1/2 lemon
- some coriander leaves,chopped
- 6 pav buns
- 1 medium sized onion, chopped
- chopped coriander leaves
- butter
- lemon wedges
Instructions
- In a pressure cooker, add all the veggies with one cup of water and pressure cook until you heard 2 whistles over medium heat or cook all the veggies with 1&1/2 cups water in a pan until the veggies are soft.
- When the pressure releases open the lid and mash them well.
- Heat a pan with oil and butter.
- When the oil heats add chopped onion and fry until they become translucent.
- Then add ginger and garlic paste and fry until a nice aroma comes.
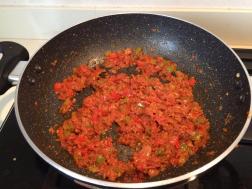
- Also, add chopped tomatoes and capsicums and then add salt, mix well and cook for 3 to 4 mins until the tomatoes are soft and mushy.
- Then add chilli powder, pav bhaji masala, cumin powder and turmeric powder.
- Mix and stir fry for 2 mins or until its raw smell goes.
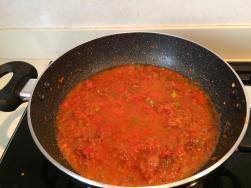
- Then add 3/4 cup of water and bring it to boil.
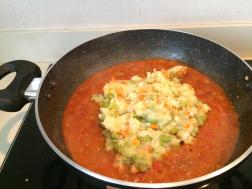
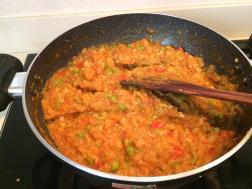
- When the water starts to boil, add mashed veggies and mix well, cook until the mixture becomes thickens.
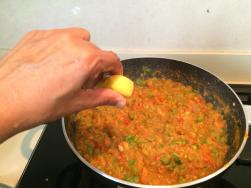
- Switch off the heat, then add chopped coriander leaves and lemon juice.
- Slit the pav buns horizontally leaving one edge intact.
- Meanwhile, heat a pan or tawa with butter and toast the buns for a minute or until lightly crisp.
- Serve the buns with hot bahji, chopped onion, coriander leaves and with lemon wedges. Enjoy!
By Santhi Therese
The Indian Claypot
Step-By-Step Instructions:
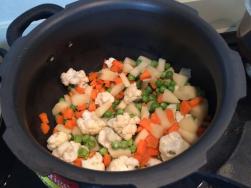

In a pressure cooker, add all the veggies with one cup of water and pressure
cook until you heard 2 whistles over medium heat or cook all the
veggies with 1&1/2 cups water in a pan until the veggies are soft.
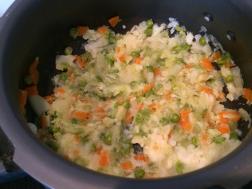
When the pressure releases open the lid and mash them well.

Heat a pan with oil and butter.
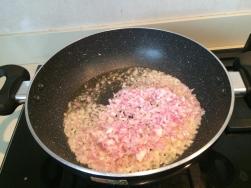
When the oil heats add chopped onion and fry until they become translucent.
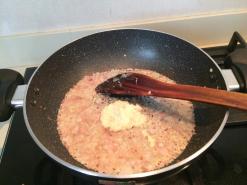
Then add ginger and garlic paste and fry until a nice aroma comes.

Also, add chopped tomatoes and capsicums
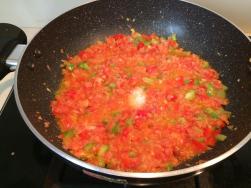
and then add salt,
mix well and cook for 3 to 4 mins until the tomatoes are soft and mushy.
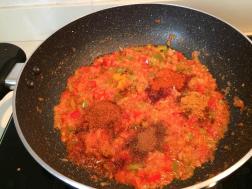
Then add chilli powder, pav bhaji masala, cumin powder and turmeric powder.
Mix and stir fry for 2 mins or until its raw smell goes.
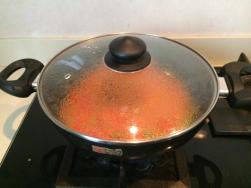
Then add 3/4 cup of water and bring it to boil.
When the water starts to boil, add mashed veggies and mix well,
cook until the mixture becomes thickens.
Switch off the heat, then add chopped coriander leaves and lemon juice.