Old Fashioned Red velvet Cake
Are you looking for an easy and delicious red velvet cake recipe? Look no further! This recipe is perfect for beginners and experienced bakers alike.

"It's Valentine's week and the air is filled with love! What could be a sweeter gesture to express your affection to your significant other than whipping up a gorgeous Red Velvet Cake? And if you're looking for a bite-sized treat, I've got you covered with my recipe for scrumptious Red Velvet Cupcakes. Head over to my blog for the full details and don't forget to share your thoughts and experiences in the comments section! ❤️🎂"
Are you looking for an easy and delicious red velvet cake recipe? Look no further! This recipe is perfect for beginners and experienced bakers alike. With simple ingredients and easy-to-follow instructions, you can impress your friends and family with this delightful dessert. Let's dive into the details of this unique red velvet cake recipe and see how you can create a show-stopping dessert in no time!
What Is Old Fashioned Red velvet Cake?
- Red velvet cake is a classic dessert known for its striking red color and rich, moist texture. This easy recipe combines the perfect balance of sweetness and cocoa flavor, making it a favorite for any occasion. With the addition of creamy frosting and decadent decorations, this red velvet cake is a delectable treat that is sure to impress. The use of buttermilk, cocoa, and a touch of vinegar creates a unique depth of flavor, while the vibrant red color adds a festive and eye-catching appeal. Whether it's a special celebration or a simple craving for something sweet, this easy red velvet cake recipe is a delightful indulgence that will leave everyone wanting more.
Why You'll Love Old Fashioned Red velvet Cake?
- Velvety Texture: This easy red velvet cake recipe produces a moist, tender crumb that melts in your mouth, making it a truly indulgent treat.
- Health Benefits: The use of buttermilk and a moderate amount of unsweetened cocoa powder adds a touch of tanginess and a hint of chocolate flavor, while also providing a dose of beneficial probiotics and antioxidants.
- Decadent Frosting: The cream cheese frosting adds a creamy, luscious layer of sweetness to perfectly complement the rich red velvet cake.
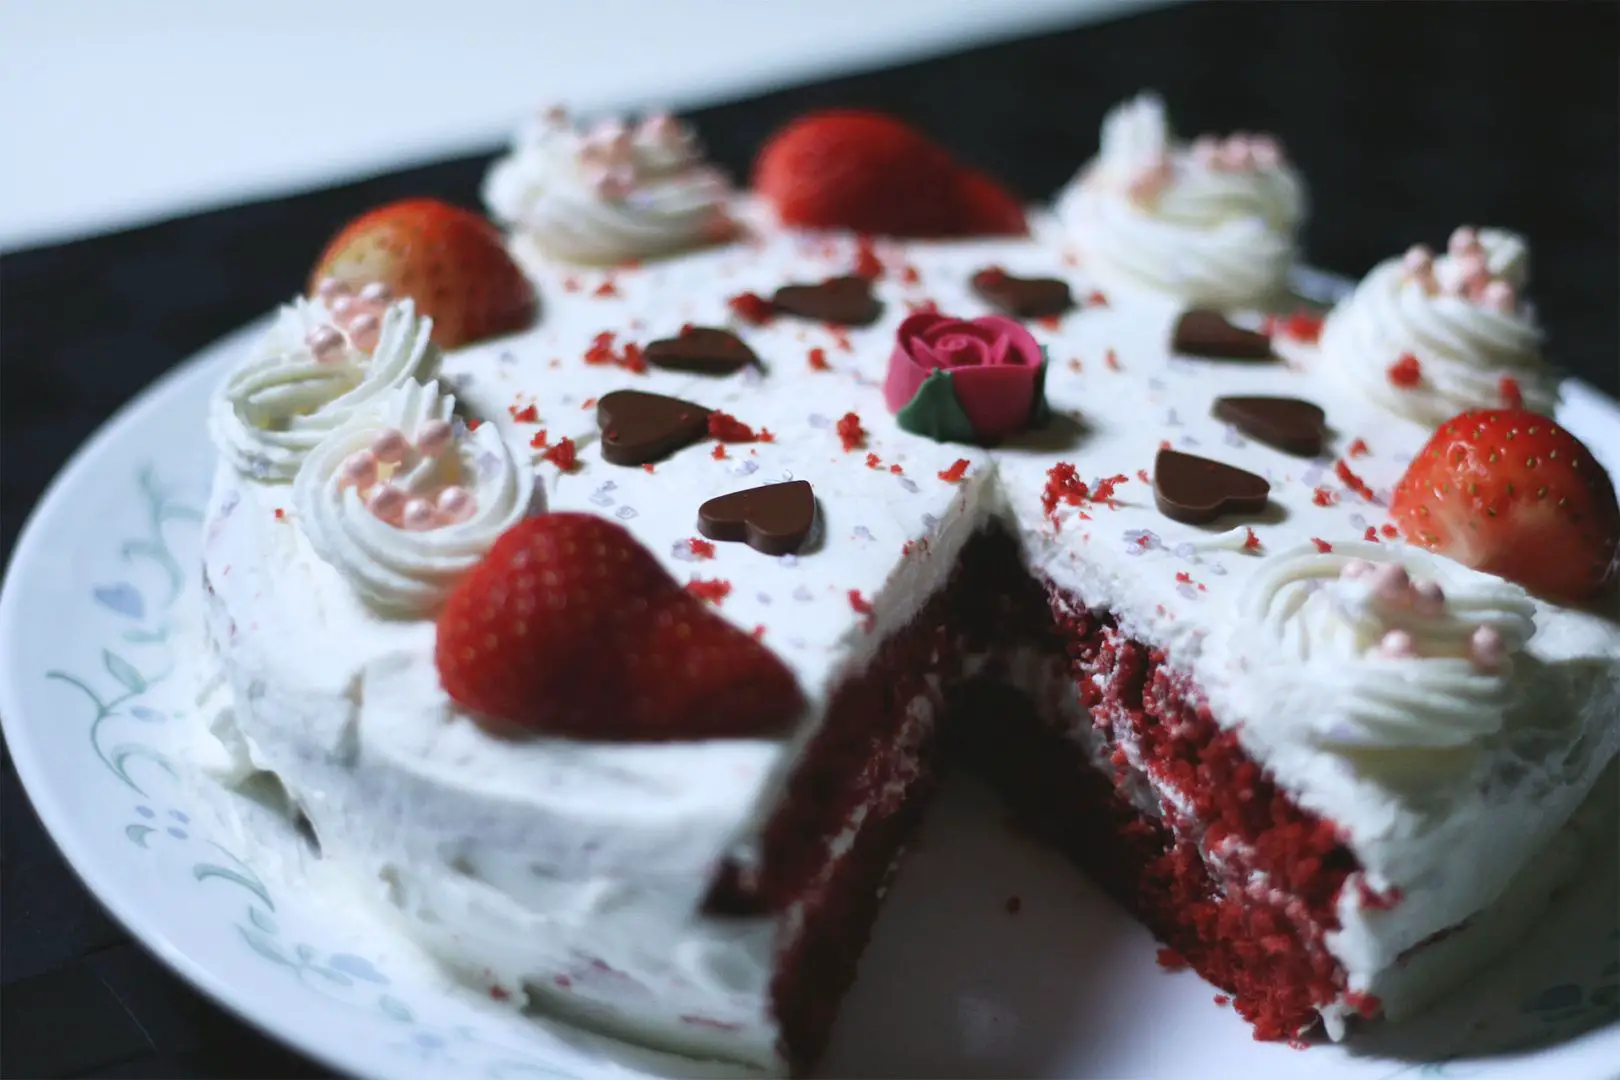
- Visually Stunning: The vibrant red color of the cake, paired with a decorative topping of strawberries and chocolate hearts, makes for an eye-catching dessert that's perfect for special occasions.
- Versatility: This recipe can be easily adapted for cupcakes or other cake shapes, and the frosting can be flavored or colored to suit your preferences.
- Long-lasting Freshness: By refrigerating the cake, you can enjoy it for up to 2-3 days, making it a convenient make-ahead option for gatherings and celebrations.
Ingredients for Old Fashioned Red velvet Cake
- All Purpose Flour: This versatile ingredient forms the base of the cake and gives it structure.
- Unsweetened Cocoa Powder: Adds a rich chocolate flavor and a deep red color to the cake.
- Unsalted Butter: Provides moisture and richness to the cake, enhancing its flavor and texture.
- Granulated White Sugar: Sweetens the cake and contributes to its tender crumb.
- Buttermilk: Adds a tangy flavor and helps to tenderize the cake, making it moist and fluffy.
- Red Food Color Liquid: Enhances the vibrant red color of the cake, giving it its signature look.
How To Make Old Fashioned Red velvet Cake?
In order to create an easy red velvet cake, follow these simple steps for a flavorful experience:
- Preheat the oven and prepare the cake pan by buttering and lining it with parchment paper. This is important to prevent the cake from sticking to the pan.
- Mix the dry ingredients together and set them aside. This step ensures that the dry ingredients are evenly distributed in the batter.
- Beat the butter and sugar until fluffy before adding the egg and vanilla essence. This helps to incorporate air into the batter, resulting in a light and fluffy cake.
- Alternate adding the dry ingredients and buttermilk, beginning and ending with the dry ingredients. This step ensures the batter is well mixed without overmixing.
- Combine and fold in the vinegar and baking soda. This reaction helps the cake rise and gives it a tender texture.
- After baking and cooling the cake, prepare the cream cheese frosting and spread it between the cake layers and on top. This step adds a creamy and tangy flavor to the cake.
- Finally, decorate the cake with strawberries and chocolate hearts before serving. This step adds a beautiful and delicious touch to the cake.
Following these steps will result in a delicious and impressive red velvet cake that is sure to impress your friends and family. Enjoy!
Serving Suggestions
- Cream Cheese Frosting: This red velvet cake pairs perfectly with a delicious cream cheese frosting. The creamy and tangy frosting complements the rich and moist cake, creating a delightful combination.
- Fresh Berries: Serve the red velvet cake with a side of fresh berries such as strawberries, raspberries, or blueberries. The fruity sweetness of the berries adds a refreshing contrast to the cake's decadent flavor.
- Vanilla Ice Cream: A scoop of creamy vanilla ice cream is an excellent accompaniment to the red velvet cake. The cold, smooth texture of the ice cream complements the cake's richness, making it a delightful dessert option.
- Coffee or Tea: Enjoy a slice of red velvet cake with a hot cup of coffee or tea. The warm beverage enhances the flavors of the cake and provides a comforting experience.
- Whipped Cream: For an extra indulgent treat, serve the red velvet cake with a dollop of whipped cream. The light and airy texture of the whipped cream adds a delightful contrast to the cake's dense crumb.
- Chocolate Garnishes: Garnish the red velvet cake with chocolate shavings or curls for a decadent touch. The addition of chocolate adds a luxurious element to the cake, making it perfect for special occasions or celebrations.
Tips for Old Fashioned Red velvet Cake
- Preparation Duration: It's important to allocate enough time for the preparation of this red velvet cake. With a prep time of 40 minutes and a cook time of 30 minutes, be sure to plan accordingly to avoid rushing the process.
- Cooking Techniques: When baking the cake, make sure to follow the instructions carefully, especially when it comes to mixing the ingredients and the baking time. This will ensure a moist and delicious red velvet cake every time.
- Importance of Garnishing: Garnishing the cake with strawberries and chocolate hearts not only adds a decorative touch but also enhances the overall presentation. Take some time to carefully decorate the cake for a visually appealing result.
- Consistency of Frosting: When making the frosting, pay attention to the consistency. Gradually adding the whipping cream and beating until the right spreadable consistency is achieved will result in a smooth and creamy frosting for the cake.
- Refrigeration Duration: After assembling the cake, it's essential to refrigerate it for at least an hour or overnight. This helps to set the frosting and allows the flavors to meld together, resulting in a more flavorful cake.
- Storage Guidelines: Once the cake is finished, it's important to store it properly. Keep it in the refrigerator and consume it on the same day or within 2 to 3 days for the best taste and freshness.
Variations for Old Fashioned Red velvet Cake
- Cream Cheese Frosting: You can add a twist to the traditional cream cheese frosting by incorporating different flavors such as almond extract, lemon zest, or even a hint of espresso for an added depth of flavor.
- Chocolate Ganache Filling: Instead of the cream cheese frosting, try filling the layers with a rich and decadent chocolate ganache. This will add a deliciously intense chocolate flavor to the cake.
- Nutty Crunch: For a crunchy texture, you can add chopped nuts like pecans or almonds to the cake batter. This will not only add a delightful crunch but also enhance the overall flavor profile of the red velvet cake.
- Fruit Infusion: Experiment with a fruit-infused twist by adding pureed raspberries or strawberries to the cake batter. This will not only add a natural sweetness but also a vibrant color to the cake.
- Creamy Topping: Instead of the traditional cream cheese frosting, consider topping the cake with a dollop of whipped cream and fresh berries for a lighter and refreshing variation.
- Vegan Alternative: For a vegan-friendly version, you can substitute the egg, butter, and buttermilk with plant-based alternatives such as flaxseed meal, vegan butter, and almond milk. This will cater to a wider audience, including those with dietary restrictions.
How to Store Old Fashioned Red velvet Cake
- Proper Refrigeration: Once the red velvet cake is frosted, it's crucial to store it in the refrigerator immediately. It's best to consume the cake on the same day itself or store it in the refrigerator under 4-degree Celsius for about 2 to 3 days to maintain its freshness.
- Use Cling Film: After the cake is completely cooled and frosted, wrap it with cling film before storing it in the refrigerator. This will help preserve the moisture and prevent the cake from drying out.
- Keep it Cool: Ensure that the cake is stored in a cool environment in the refrigerator to prevent the frosting from melting or becoming too runny.
- Divide and Store: If you have leftover cake, you can cut it into individual serving sizes, wrap them in cling film, and store them in an airtight container. This will make it easier to grab a slice without compromising the freshness of the remaining cake.
- Refrigerate Cream Cheese Frosting: In case you have leftover cream cheese frosting, store it in an airtight container in the refrigerator. Make sure to use it within a few days to maintain its smooth consistency.
- Avoid Freezing: It's not recommended to freeze the red velvet cake, as the texture of the cake and the cream cheese frosting may become compromised. Therefore, it's best to stick to refrigeration for storage.
By following these simple storage tips, you can ensure that your homemade red velvet cake stays fresh and delicious for as long as possible.
Frequently Asked Questions (FAQs)
Can I use a different type of food coloring?
- Yes, you can use gel food coloring instead of liquid food coloring. Just make sure to adjust the quantity accordingly as gel food coloring is more concentrated.
Can I make this cake without buttermilk?
- If you don't have buttermilk on hand, you can make a buttermilk substitute by adding 1 tablespoon of white vinegar or lemon juice to a measuring cup, then fill with milk to the 1 cup measurement line. Let it sit for 5-10 minutes before using in the recipe.
How can I make the frosting creamier?
- To make the cream cheese frosting creamier, make sure the cream cheese is at room temperature before beating. This will ensure a smoother and creamier consistency. You can also adjust the amount of powdered sugar and heavy whipping cream to reach your desired texture.
Can I make this cake in advance?
- Yes, you can make the cake in advance and store it in the refrigerator for up to 2 to 3 days. Just make sure to wrap it tightly with cling film to keep it fresh.
Can I use a different type of flour?
- You can use cake flour instead of all-purpose flour for a lighter texture. If you use cake flour, reduce the amount to 120 grams and omit the salt.
Can I freeze the cake?
- Yes, you can freeze the unfrosted cake layers for up to 2 months. Just wrap each layer tightly in plastic wrap and then in aluminum foil before placing in the freezer. Thaw in the refrigerator before frosting and assembling the cake.
You may also like my other cake recipes Eggless Sponge Cake, Coffee Cake, Pineapple Cake and Lemon Yogurt Cake.
Old Fashioned Red velvet Cake 2017-02-03 04:41:11

Recipe Card
Old Fashioned Red velvet Cake
Serves: 8
Prep Time: 40 minutes
Cook Time: 30 minutes
Total Time: 1 hour 10 minutes
Ingredients
- 130 grams all-purpose flour
- 1/4 tsp salt
- 1 tbsp unsweetened cocoa powder
- 55 grams unsalted butter
- 150 grams granulated white sugar
- 1 large egg
- 1/2 tsp vanilla essence
- 120 ml buttermilk
- 1 tbsp red food color liquid
- 1/2 tsp vinegar
- 1/2 tsp baking soda
For Cream Cheese Frosting
- 8 ounce cream cheese
- 1/2 tsp vanilla essence
- 1/2 cup powdered sugar
- 3/4 cup heavy whipping cream
Instructions
- Preheat oven to 175 degrees C. Butter 8 inch round cake pan and then line the bottom of the pan with parchment paper and keep it aside.
- In a wide bowl, mix together sifted all-purpose flour, salt, and cocoa powder until combined and keep it aside.
- In a bowl of an electric mixer (with paddle attachment) or with a hand mixer, beat the butter until soft about 1 minute.
- Also add the sugar and beat until fluffy about 2 to 3 mins.
- Then add the egg and beat well, scrape down the sides of the bowl.
- Beat in the vanilla essence until just combined.
- Meanwhile, mix together buttermilk and red food color in a measuring cup until incorporated and keep it aside.
- With the stand mixer on low speed, alternately add the flour mixture in three additions and buttermilk in two additions, beginning and ending with flour until combined.
- In a small cup, combine vinegar and baking soda and allow it to fizz and then quickly add this to the cake batter and fold it gently.
- Immediately transfer this batter to the cake pan, level it with a spatula and bake it in the preheated oven for about 25 to 30 mins or until a toothpick inserted in the center of the cake comes out clean.
- Cool the cake in its pan on a wire rack for about 10 mins.
- After 10 mins invert the cake on a wire rack and cool it completely and wrap it with cling film and keep it in the refrigerator for at least an hour or overnight.
- In a bowl of electric mixer with whisk attachment or with a hand mixer, beat the cream cheese until smooth.
- Add vanilla essence and powdered sugar and beat until smooth.
- Then gradually add the whipping cream and beat in high speed until you get the right consistency to spread.
- Cut the cake horizontally with a sharp knife, spread the frosting in between the layers, and at the top and sides of the cake.
- Decorate the cake with strawberries and chocolate hearts as desired.
- Once finished, keep the cake in the refrigerator immediately and consume on the same day or keep it in the refrigerator under 4-degree Celsius for 2 to 3 days.